|
Mumble Tutorials:
Connecting to the Server |
Creating a Private Room |
Sending Images
Using an Avatar and Overlay |
Hide OS Information |
Additional Audio Configuraiton
Mumble Tutorials (Mobile):
Connecting to the Server on Android |
Connecting to the Server on iOS
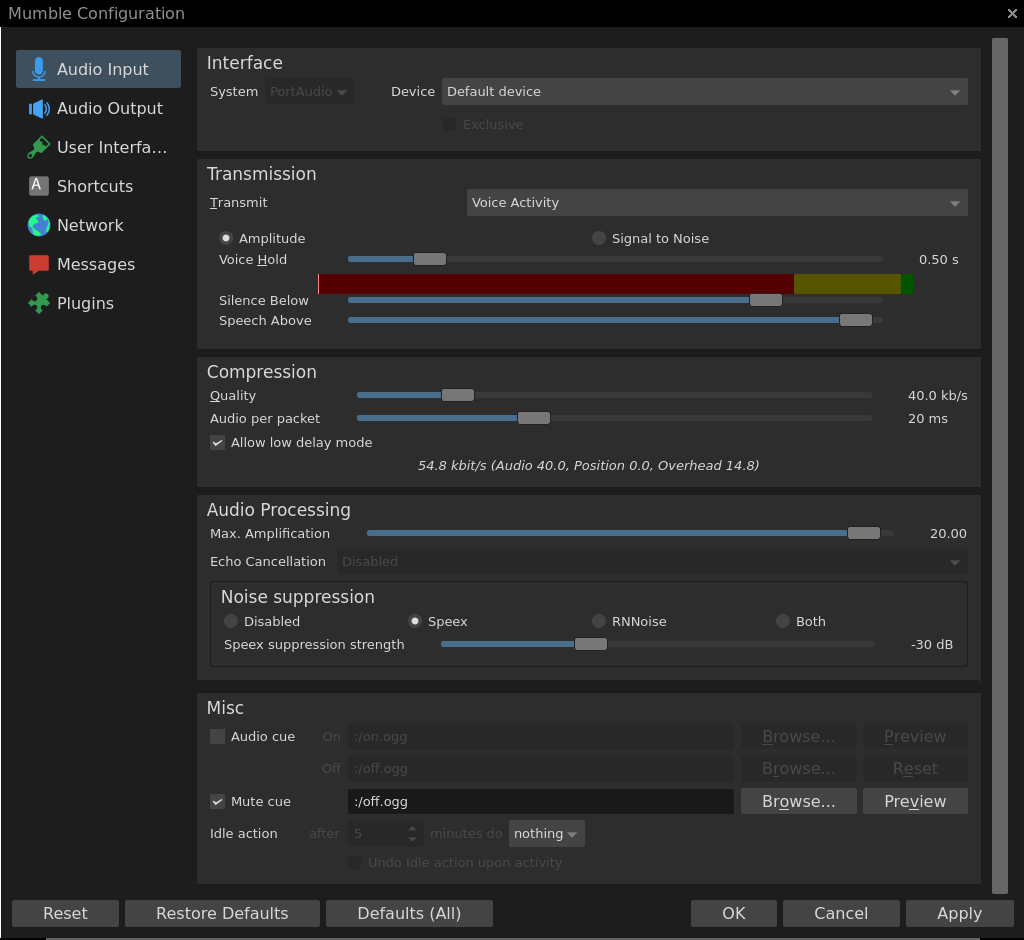
Interface
System
On Windows the default audio system can be left at WSAPI.
On GNU/Linux there are about five(!) audio systems and depending on your system you may have all or just one.
If PulseAudio is available use this as the default. It should require little configuration and support echo cancellation.
On OpenBSD the default audio system can be left at PortAudio (sndiod).
Device
Select your microphone here.
Exclusive
Typically only applies to Windows.
Selecting this will make your microphone exclusive to Mumble and no other program.
This is generally never needed.
Transmission
Transmit
There are three options here:
- Continuous - No processing. Microphone always on.
- Voice Activity - Audio processed according to settings. Microphone only on when needed (if settings are good).
- Push To Talk - No processing. Microphone only on when hotkey is used.
Continuous should never be used unless you have a good microphone or are in a very quiet room.
Push To Talk is tedious to use when playing a video game where you may not have time to press the hotkey.
So the best option to use here is Voice Activity, but most of the time the default settings won't be good.
Even if you set up your microphone with the audio configuration from the first run, there are still some issues.
To start things off, speak into the microphone and pay attention to the audio meter (red/yellow/green)
If you spoke and the meter started from red and stops in the yellow or green section, then you should be fine with what you have for the Amplitude or Signal to Noise setting.
If you spoke and...
- the meter moved all the way from red to the end of the green bar instantly
- the meter moves all over the place constantly
- the meter didn't move or barely moved at all
then switch from either Amplitude or Signal to Noise depending on what is set for you.
If both Amplitude or Signal to Noise are both problematic, then choose the less problematic of the two.
Next slide the Silence Below slider to the position to where the bar goes to when you are not talking.
Then make some taps on your desk or other noises that you don't want to be captured by the microphone and slide the Silence Below slider to the position where the bar goes to.
Now talk normally and slide the Speech Above slider to the position where the bar goes to.
Whenever you talk now the bar should now be in the green area and whenever you are not talking it should stay in the red or yellow area.
If this isn't the case adjust these two sliders to achieve this reliably or somewhat reliably.
You may also have to adjust the Voice Hold setting for situations where:
- you are done talking, but your microphone is still staying on
- you are done talking, but your microphone gets cut off too quickly
Audio Processing
Echo Cancellation
If you are able to, set this to Multichannel echo cancellation.
If your audio meter is still inconsistent or you are having problems with your microphone being either too loud or too quiet, continue on with this section.
Noise Suppression
With newer versions of Mumble it is now possible to completely disable noise suppression and to use Speex and RNNoise together for noise suppression.
You can try to disable noise suppression to see if it is making your microphone too quiet.
To begin, select Speex and adjust the Speex suppression strength to a lower negative decibel level (-15dB) if you need your microphone to be louder or to a higher negative decibel level (-60dB) if you need your microphone to be more quieter.
You can also try RNNoise, but the success of RNNoise will vary.
As for using both Speex and RNNoise together you will have to try that yourself as this option is new and I have not tried it or used it myself yet.
Max Amplification
You can adjust this slider to a low or high level depending if your microphone is too loud or too quiet.
I highly recommend to try the next section before messing with this setting since I can recall this causing minor to major quality loss.
System Settings
Before adjusting your operating system settings be sure to check if your microphone has a physical volume slider. If not, continue on.
Windows
1. Press the Windows key and R at the same time. Once the run window has opened, enter in control and press enter.
2. Once the control panel has opened, go into the Hardware and Sound category and then Sound settings. It should look something like this:
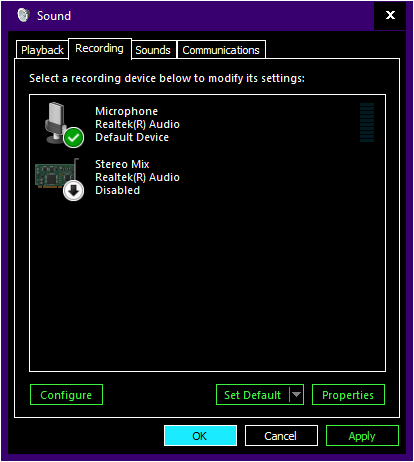
3. Select your microphone from the list and then press the Properties button.
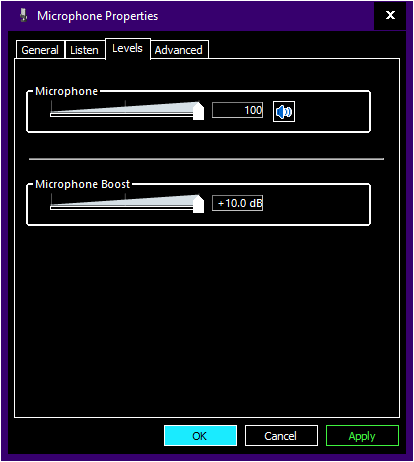
4. Once the microphone properties window opens you can then adjust your microphone volume and boost levels in the Levels tab.
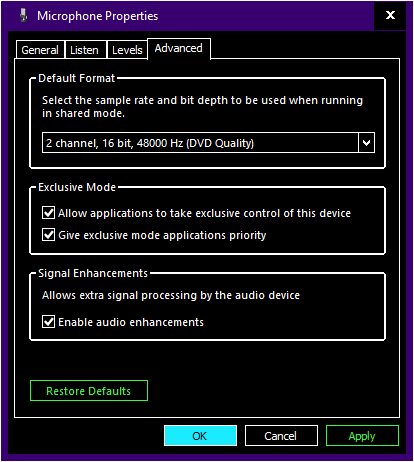
You can also adjust the number of channels, bit type, and frequency your microphone uses in the Advanced tab.
If you can change these values i'd recommend using 2 channel, 24 bit, and 48000 hertz if possible (or higher if you want to).
Warning! Programs or games that include voice or microphone functionality can potentially mess with your settings in Windows!
A great example I can give is the game Left 4 Dead. In the game settings you will see a slider to adjust your microphone volume.
Although it may appear it is only messing with the microphone volume just for the game this isn't the case.
What ends up happening is that the game links the microphone volume from Windows to the game.
So if you mute your microphone for the game it will in turn mute your microphone for Windows which in turn mutes your microphone for Mumble.
GNU/Linux
Unfortunately GNU/Linux has zero standardization's so providing instructions that will work for all GNU/Linux users is impossible.
Best advice I can offer is to either read your distribution's documentation (if any exists to begin with) or to use a search engine.
OpenBSD
To enable microphone recording:
# sysctl kern.audio.record=1
To adjust the number of channels, bit type, and frequency of your audio driver:
# audioctl -f /dev/audio0 play.channels=2
# audioctl -f /dev/audio0 record.channels=2
# audioctl -f /dev/audio0 encoding=s24le4msb
# audioctl -f /dev/audio0 rate=48000
To unmute the microphone and adjust the microphone volume:
$ sndioctl input.mute=0
$ sndioctl input.level=1.0
Misc
With new versions of Mumble Audio cue is still disabled and Mute cue has been introduced and is enabled by default.
I found this new default to be quite annoying since I had people saying "What is that noise?" to which I had no idea what they were talking about until I recently updated Mumble and had the same problem myself.
Long story short, disable Mute cue if you don't want to hear a sound effect every five or ten seconds when someone is muted in a room.
How do I fix echo?
The best way to fix this is to make sure you have set the proper setting for Audio Processing > Echo Cancellation.
If this still doesn't work, open your Mumble audio settings and leave it open. Then have the person complaining about the echo talk.
You can tell the echo is happening on your end if you are not talking, but see the audio meter go to green.
Here you can adjust the Transmission section so that Speech Above is at the position where the other person is talking and the Voice Hold option is set to only output your audio for the duration needed.
You may still have to adjust other settings in order to completely remove the echo, but most of those settings are noted here.
In the instance that the echo is happening but it is not on your end you will have to have the other person fix it on their end.
|
